In most remodeling projects, you should finish the walls before installing the floors. Painting, patching drywall, and completing wall treatments first prevents dust, drips, and debris from damaging your new flooring, which saves you money on repairs and material replacement.
Getting this sequence wrong is one of the most common and costly mistakes homeowners make during a renovation. The order you follow directly affects your budget, your timeline, and the quality of the finished result.
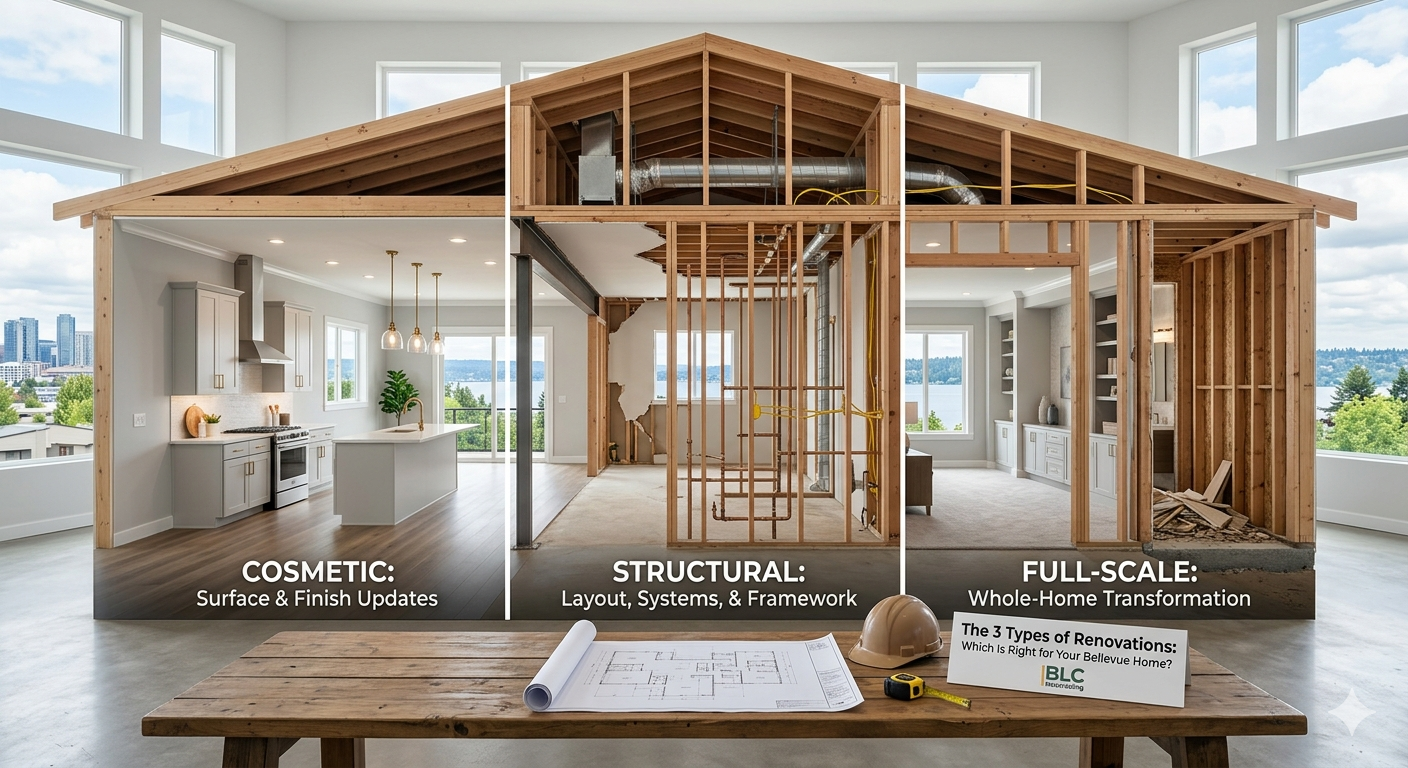
This guide walks you through the standard renovation sequence, the exceptions where floors go first, room-by-room breakdowns, and how to avoid expensive rework during your Bellevue home remodel.
The Standard Rule: Walls Before Floors
The walls-before-floors approach is the industry standard for residential remodeling. It exists for practical reasons rooted in how construction trades work, how materials behave, and how damage occurs during a renovation.
Why Most Contractors Recommend Starting With Walls

Wall work is inherently messy. Hanging drywall produces fine gypsum dust that settles on every surface. Mudding and sanding joints creates additional particulate. Priming and painting introduce the risk of drips, roller splatter, and spills.
If your new hardwood, luxury vinyl plank, or carpet is already installed, all of that debris lands directly on your finished floor. Even with protective coverings, dust finds its way into seams, paint bleeds through drop cloths, and heavy tools get dragged across surfaces.
Contractors schedule wall work first because it eliminates these risks entirely. There is no floor to protect, no material to replace, and no extra labor hours spent on cleanup. The subfloor handles the abuse, and the finished flooring goes in on a clean, completed surface.
Electricians, plumbers, and HVAC technicians also need wall access for rough-in work. Running wires, installing outlet boxes, and routing supply lines all happen behind the drywall. These trades generate their own mess and require open wall cavities. Completing this work before flooring keeps the project moving efficiently and prevents scheduling conflicts between trades.
How This Sequence Protects Your Flooring Investment
Flooring is one of the most visible and expensive components of any remodel. Hardwood flooring in the Bellevue area typically ranges from $8 to $15 per square foot installed, and engineered options run $6 to $12 per square foot. Replacing even a small section due to paint damage or drywall dust contamination adds hundreds of dollars in unplanned costs.
The walls-first approach treats your flooring as a near-final finish. By the time flooring installers arrive, the heavy, dirty work is done. Walls are painted, trim is prepped, and the room is ready for a clean installation. This sequence protects your investment and ensures the flooring looks exactly as intended on move-in day.
When You Should Install Floors Before Walls
The walls-first rule has real exceptions. Certain materials, layouts, and design goals require flooring to go down before wall finishes are complete. Knowing when to break the standard sequence prevents structural issues and design compromises.
Open-Concept Layouts and Continuous Flooring
If you are running the same flooring material continuously through multiple rooms without transitions, the flooring often needs to go in before partition walls, built-ins, or cabinetry are set in place. This is especially common in open-concept living spaces where hardwood or LVP flows from the kitchen through the dining area and into the living room.
Installing the flooring first in these cases creates a seamless plane. Walls and cabinets then sit on top of the floor, which allows the material to expand and contract uniformly underneath. If you frame walls first and then try to weave flooring between them, you end up with visible seams, transition strips, and expansion gaps that compromise the continuous look.
Tile and Stone Installations That Require a Floor-First Approach
In bathrooms and certain kitchen designs, floor tile sometimes needs to go in before wall tile. This happens when the wall tile sits on top of the floor tile to create a waterproof overlap at the base of the wall. The floor tile acts as the foundation layer, and the wall tile laps over it to direct water down onto the floor surface rather than behind it.
This is standard practice in shower surrounds, tub enclosures, and wet rooms. The floor gets tiled, the waterproof membrane is verified, and then wall tile is installed with a slight overlap at the floor line. Reversing this sequence creates a gap where water can penetrate behind the wall tile and cause mold, rot, and structural damage over time.
The Correct Remodeling Sequence for a Full Room Renovation
Understanding where floors and walls fit requires seeing the full renovation sequence. Each phase builds on the previous one, and skipping steps or reordering them creates problems that compound as the project progresses.
Demolition and Structural Work
Every remodel starts with removing what needs to go. Old flooring, damaged drywall, outdated fixtures, and any structural elements being modified come out first. If walls are being moved, headers are being installed, or load-bearing elements are being altered, that structural work happens during this phase.
Demolition is the dirtiest stage of any project. It generates dust, debris, and vibration that would destroy any finished surface. This is why no finish materials, whether flooring, paint, or trim, should be in place during demo.
Rough-In Plumbing, Electrical, and HVAC
Once the space is opened up, the mechanical trades come in. Plumbers run supply and drain lines. Electricians pull wire, install boxes, and route circuits. HVAC technicians extend or modify ductwork.
All of this work happens inside wall cavities and under subfloors. It must be completed and inspected before walls are closed up. In Bellevue, rough-in inspections are required by the City of Bellevue Building Services before drywall can be hung. Failing to schedule this inspection on time is a common cause of project delays.
Drywall, Mudding, and Priming
After rough-in passes inspection, drywall goes up. Sheets are cut, hung, screwed, and taped. Joints are mudded in multiple coats, sanded smooth, and primed.
This phase produces significant dust. Drywall sanding dust is extremely fine and penetrates everything. It gets into HVAC systems, settles into floor crevices, and coats every surface in the room. This is the single biggest reason flooring should not be installed before drywall work is complete.
Painting Walls and Ceilings
With drywall primed, painting begins. Ceilings are typically painted first, then walls. Two coats of finish paint are standard for new construction and remodels.
Painting before flooring installation means you do not need to worry about cutting in perfectly at the floor line. Painters can work freely without taping off expensive flooring or worrying about roller drips on hardwood. Touch-up painting after flooring and trim installation is normal and expected, but the bulk of the work is done before the floor goes in.
Flooring Installation
This is where your finished floor material goes down. Whether it is hardwood, engineered wood, LVP, tile, or carpet, installation happens on a clean, painted, and dry surface.
Flooring installers need the room to be climate-controlled and free of other trades. Hardwood and engineered wood need to acclimate to the room’s temperature and humidity for 48 to 72 hours before installation. Rushing this step leads to gaps, buckling, and warranty issues.
For Bellevue homes, where seasonal humidity swings are common due to the Pacific Northwest climate, proper acclimation is especially important. Your contractor should verify moisture levels in both the subfloor and the flooring material before installation begins.
Trim, Baseboards, and Final Finishes
Baseboards, crown molding, door casings, and shoe molding go in last. These trim pieces cover the expansion gaps at the edges of the flooring and create a finished transition between the wall and the floor.
Trim is caulked, filled, and given a final coat of paint after installation. This is also when final electrical covers, switch plates, and fixture installations happen. The room is essentially complete after this phase.
Room-by-Room Breakdown: Floors or Walls First
The general sequence applies across most rooms, but specific spaces have unique considerations that affect the order of operations.
Kitchen Remodeling Sequence
Kitchens are the most complex room to sequence because they involve cabinetry, countertops, plumbing fixtures, and appliances in addition to walls and floors.
The standard kitchen sequence is: demolition, rough-in, drywall, painting, cabinets, countertops, flooring, then trim and appliances. In most kitchen remodels, flooring goes in after cabinets are set. Cabinets sit on the subfloor, and flooring runs up to the cabinet toe kick. This saves material cost because you are not paying for flooring hidden under cabinets.
However, if you are installing a floating floor like LVP, some contractors prefer to run it under the cabinets so the floor can expand and contract freely. Discuss this with your contractor before cabinet installation day.
Bathroom Remodeling Sequence
Bathrooms follow the walls-first rule with the tile exception noted earlier. The typical sequence is: demolition, rough-in plumbing and electrical, waterproofing membrane, floor tile, wall tile, vanity and fixtures, then trim.
Waterproofing is critical in bathrooms. The membrane must be applied and tested before any tile goes down. In Bellevue, where homes range from mid-century builds to new construction, existing bathroom subfloors often need repair or replacement before waterproofing can be applied. Budget for this possibility.
Living Room and Bedroom Remodeling Sequence
These rooms are the most straightforward. Walls are finished and painted first. Flooring goes in second. Trim and baseboards complete the room.
If you are refinishing existing hardwood rather than installing new flooring, the sequence shifts. Sanding and refinishing hardwood is extremely dusty and requires the room to be sealed off. In this case, refinish the floors first, let them cure completely, then do any wall touch-up painting with careful floor protection in place.
Basement Finishing Sequence
Basements in Bellevue often require moisture mitigation before any finish work begins. Vapor barriers, sump pumps, and drainage systems must be addressed first.
After moisture control, the sequence follows the standard order: framing, rough-in, insulation, drywall, painting, flooring, trim. Basement flooring choices should account for potential moisture. LVP, tile, and engineered wood with moisture-resistant cores perform better than solid hardwood in below-grade applications.
How the Floors-or-Walls Decision Affects Your Remodeling Budget
Sequencing is not just a construction logistics issue. It has direct financial consequences that affect your total project cost.
Cost of Repairing Damaged Floors From Wall Work
Replacing a section of damaged hardwood flooring costs $200 to $500 depending on the species, the area affected, and whether the replacement boards can be color-matched to the existing floor. Refinishing an entire room to blend a repair adds $3 to $8 per square foot.
These costs are entirely avoidable with correct sequencing. Paint drips on new LVP, drywall dust ground into carpet fibers, and scratches from drywall stilts on hardwood are all damage types that result from installing floors too early.
Labor Scheduling and Trade Coordination Costs
When trades have to work around finished floors, they work slower. Drywall crews lay protective coverings, tape seams, and move carefully instead of working at full speed. Painters spend extra time masking and protecting floor edges. These precautions add labor hours to every trade that follows the flooring installation.
A well-sequenced project keeps each trade working at peak efficiency. The drywall crew finishes and leaves. The painters come in on a clean surface. The flooring crew installs on a painted, dry room. No overlap, no protection protocols, no wasted time.
Material Waste and Rework Expenses
Incorrect sequencing sometimes forces rework. If flooring is installed before walls are finished and gets damaged, you may need to pull up and replace sections. Flooring material that has been cut and installed cannot be returned. You are buying replacement material at full price, plus paying labor to remove the damaged pieces and install new ones.
Rework is the most expensive line item on any remodeling budget because you are paying twice for the same result. Proper sequencing eliminates rework almost entirely.
Common Mistakes Homeowners Make With Renovation Sequencing
Even with a clear plan, certain mistakes come up repeatedly. Knowing what to watch for helps you avoid them.
Installing Hardwood Before Painting
This is the most common sequencing error in residential remodeling. Homeowners get excited about seeing their new floors and push for early installation. The result is paint splatter on new hardwood, sanding dust embedded in the finish, and scratches from ladders and equipment.
Hardwood should be one of the last materials installed in any room. The only work that should happen after hardwood installation is trim, final paint touch-ups with careful protection, and fixture installation.
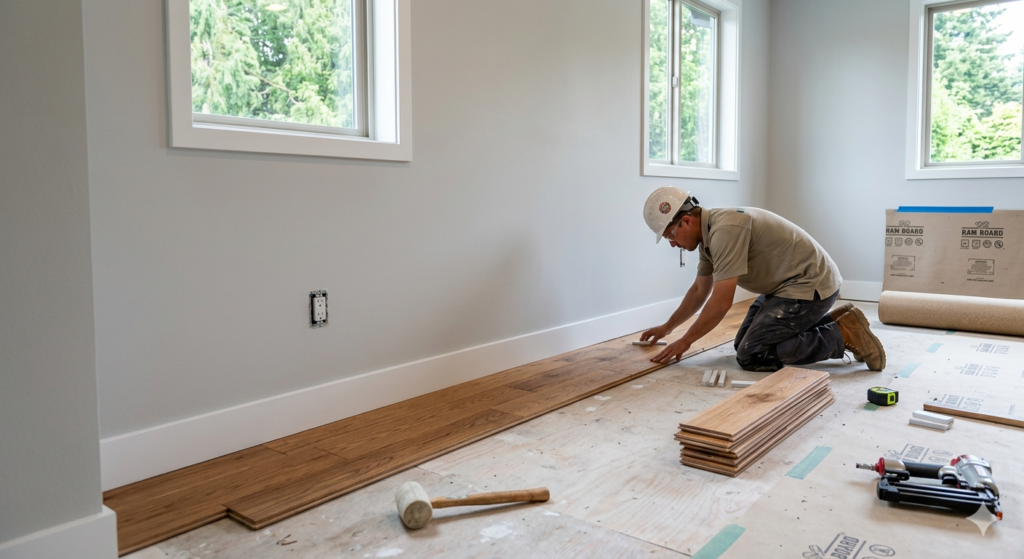
Skipping Floor Protection During Wall Work
If circumstances require flooring to be in place before wall work is complete, floor protection is mandatory. Ram Board, heavy-duty rosin paper, or adhesive floor protection film should cover every square inch of finished flooring.
Cheap plastic sheeting is not adequate. It tears, shifts, and allows debris to grind against the floor surface underneath. Invest in proper protection materials or accept the risk of damage.
Not Accounting for Flooring Height With Door Frames and Cabinets
New flooring changes the finished floor height. If you are going from carpet to hardwood, or from vinyl sheet to tile, the floor level may rise by a quarter inch to three-quarters of an inch. This affects door clearance, cabinet height, and transition thresholds to adjacent rooms.
Measure and plan for the new floor height before any installation begins. Doors may need to be trimmed. Cabinets may need height adjustments. Transition strips between rooms with different flooring types need to be ordered at the correct height differential.
How Bellevue Homeowners Can Plan the Right Renovation Order
Planning the correct sequence before work begins saves time, money, and frustration. The right contractor will build this sequence into your project plan from day one.
Working With a Contractor to Set the Correct Sequence
A qualified remodeling contractor creates a detailed scope of work that specifies the order of every phase. This document should list each trade, their scheduled dates, inspection milestones, and material delivery timelines.
In Bellevue, where permit requirements and inspection schedules are managed by the City of Bellevue Development Services, your contractor should also account for inspection wait times in the project timeline. Rough-in inspections, framing inspections, and final inspections each require scheduling and can add days to the project if not planned in advance.
Ask your contractor to walk you through the full sequence before signing a contract. If they cannot clearly explain why each phase happens in a specific order, that is a red flag.
Questions to Ask Before Your Remodel Begins
Before your project starts, get clear answers to these questions:
What is the full construction sequence for my project? Your contractor should provide a written schedule showing every phase from demolition through final walkthrough.
When will flooring be installed relative to wall work? The answer should align with the principles in this guide. Walls first in most cases, with clear reasoning if the sequence differs.
How will you protect finished surfaces during subsequent work phases? Any work that happens after flooring installation should include a protection plan.
What happens if the sequence needs to change mid-project? Material delays, inspection failures, and weather can all force schedule adjustments. Your contractor should have contingency plans.
Who coordinates the trade schedule? On a well-run project, one person manages the sequence of subcontractors. Gaps between trades waste time. Overlapping trades create conflicts. Coordination is where project management earns its value.
Conclusion
The correct renovation sequence, walls before floors in most cases, protects your materials, controls your budget, and keeps your project on schedule. Understanding the exceptions and planning room by room ensures every decision is intentional.
For Bellevue homeowners navigating a remodel, working with a contractor who builds the right sequence into the project plan from the start eliminates the most common and costly mistakes. Clear scheduling, trade coordination, and material timing all flow from getting the order right.
At BLC Remodeling, we plan every project phase so your renovation stays on budget, on time, and built to last. Contact us today to start planning your Bellevue home remodel with a team that gets the details right.
Frequently Asked Questions
Should I paint walls before or after installing hardwood floors?
Paint walls before installing hardwood floors. Painting first eliminates the risk of drips, splatter, and sanding dust landing on your finished flooring. Minor touch-up painting after floor installation is normal and much easier to manage than repairing damaged hardwood.
Do you tile the floor or walls first in a bathroom remodel?
In most bathroom remodels, floor tile goes down first. Wall tile then overlaps the floor tile at the base, creating a watertight seal that directs water onto the floor surface rather than behind the wall. This overlap prevents moisture intrusion and long-term water damage.
Can I install flooring before drywall is finished?
You should not install finished flooring before drywall work is complete. Drywall hanging, mudding, and sanding produce fine dust that contaminates flooring surfaces and seams. Wait until drywall is fully finished, primed, and painted before scheduling flooring installation.
What is the correct order of operations for a full home remodel?
The standard sequence is demolition, structural work, rough-in mechanical trades, inspections, drywall, painting, cabinetry, countertops, flooring, trim, fixtures, and final cleanup. Each phase builds on the previous one, and skipping or reordering steps leads to rework and added costs.
How do I protect new floors during a renovation?
Use heavy-duty floor protection like Ram Board, contractor-grade rosin paper, or adhesive protection film. Avoid thin plastic sheeting, which tears and allows debris to grind against the floor. Tape seams securely and replace protection material if it becomes damaged during the project.
Does renovation sequencing affect my remodeling budget?
Yes. Incorrect sequencing leads to material damage, rework, slower trade productivity, and additional protection costs. A properly sequenced project keeps each trade working efficiently and eliminates the expense of repairing or replacing finished surfaces damaged by subsequent work phases.
Should I remodel one room at a time or the whole house at once?
Whole-house remodels are typically more cost-effective per square foot because trades mobilize once and work continuously. Single-room remodels offer lower upfront costs and less disruption. Your decision should factor in budget, timeline, living arrangements during construction, and whether adjacent rooms share systems like plumbing or electrical circuits.